
Hey there, my fellow tech-savvy good friend!
Are you able to learn to create a digital machine on AWS? AWS (Amazon Net Providers) is a cloud computing platform that
permits you to create and handle digital servers. It is easy, environment friendly, and might help you save lots of money and time.
So, let’s get began, lets?
Step 1: Create an AWS Account
Earlier than you can begin creating digital machines, you will have to create an AWS account.
Don’t be concerned, it is simple and free, and can solely take a couple of minutes.
Simply head on over to the AWS residence web page (https://aws.amazon.com/) and click on on the “Create an AWS account” button

Step 2: Entry the EC2 Dashboard
As soon as you have created your account and logged in, you’ll be taken to the AWS Administration Console.
From there, click on on the “EC2” service below the “Compute” part to entry the EC2 dashboard.

Step 3: Launch a New Occasion
On the EC2 dashboard, click on on the “Launch Occasion” button to start launching your new digital machine.
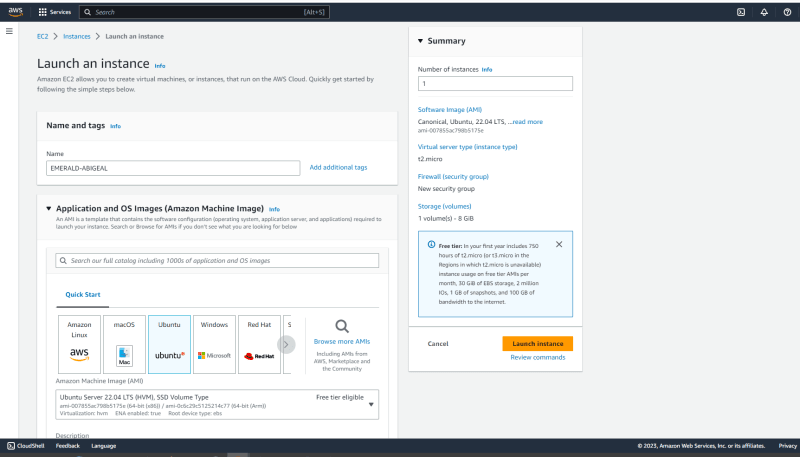
Step 4: Select an Amazon Machine Picture (AMI)
An Amazon Machine Picture (AMI) is a pre-configured digital machine picture that you would be able to launch in your EC2 occasion.
Select the AMI that matches your particular wants.
As an example, it’s possible you’ll need to select one which has an working system already put in,
similar to Microsoft Home windows or Linux. It will stress you if you happen to do not select the suitable working system.

Step 5: Select an Occasion Sort
As soon as you have chosen your AMI, you will have to decide on an occasion kind.
It will decide the dimensions and capability of your digital machine.

Step 6: Configure Occasion Particulars
The following step in creating your digital machine is to configure some occasion particulars.

Step 7: Create Key Pair
Create key pair(This is a vital half as you want to use it.)
You possibly can select your community settings, such because the safety group and subnet, in addition to your storage settings.

Step 8: Configure Safety Group
It is necessary to configure your occasion’s safety group to permit solely the visitors that you really want.
This helps you retain your digital machine secure from unauthorized entry.
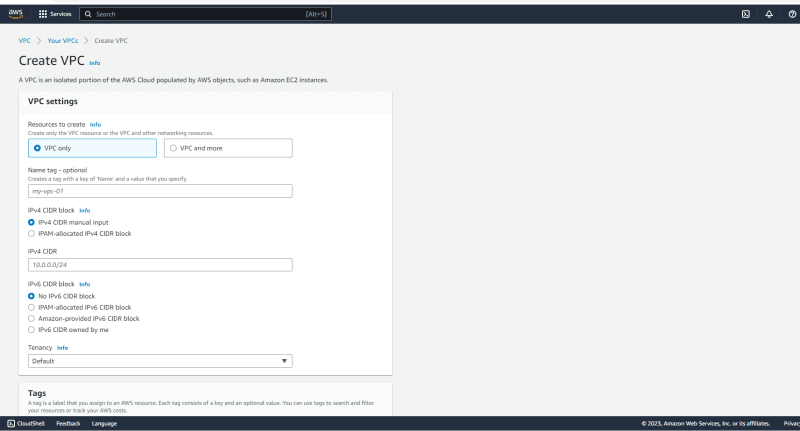
You too can select to create/customise your personal vpc (Amazon Digital Personal Cloud) as seen beneath:


Step 9: Add Tags (Optionally available)
Including tags to your EC2 occasion might help you retain observe of a number of cases and set up them higher.
This step is optionally available, however beneficial.
Step 10: Assessment and Launch
Earlier than launching your digital machine, take a second to evaluate your settings and make any obligatory adjustments.
As soon as all the things appears good, click on on the “Launch” button.
Step 11: Examine Your Launch Standing and join
After you might have efficiently launched your occasion and obtained success messages like this (image beneath):

click on in your occasion to view your progress,you would possibly should be just a little affected person because it initializes first earlier than displaying this(image beneath):


Step 12: Entry Your New Digital Machine
After launching your digital machine, you possibly can entry it utilizing a Distant Desktop Protocol (RDP) consumer.
To do that, you will have to attend for the occasion to finish its launch course of, retrieve the generated key pair,
and configure a community entry rule.

Obtain your RDP file. 
Get your password and decrypt the password then hook up with your Distant Desktop Connection.

Lastly, bear in mind to terminate unused cases or cease cases to retrieve it for later.

Congratulations, my good friend! You’ve got efficiently created your very personal digital machine on AWS! I hope you
loved creating your AWS Ec2 cases as a lot as I do. Bear in mind to love , share and observe.