
The expertise panorama is consistently altering with new and revolutionary options. This has allowed the trade to make the most of fashionable engineering options equivalent to Docker, Kubernetes, managed providers, and serverless capabilities when constructing and deploying software program.
In truth, serverless capabilities have leveled the enjoying discipline by giving builders the required flexibility to construct and ship software program quick at a decreased value and with good developer expertise.
On this publish, we’ll discover how Appwrite is altering the sport by means of its serverless operate providing and assist for a number of content material sorts; we’ll additionally display find out how to use it in a Flutter software.
GitHub hyperlinks
The undertaking supply codes are beneath:
Stipulations
To completely grasp the ideas offered on this tutorial, the next are required:
Serverless capabilities on Appwrite
Appwrite offers a novel method to managing and internet hosting serverless capabilities inside both a safe cloud or self-hosted surroundings, providing a superb consumer expertise for builders. As well as, it additionally lets builders:
- Customise and prolong code capabilities
- Simplify deployment complexities
- Successfully tackle scalability considerations
Past its extensibility, security measures, and different invaluable capabilities, Appwrite additionally facilitates the return of assorted content material sorts as a response, equivalent to JSON, HTML, Textual content, and extra. This functionality is transformative and a game-changer as a result of it permits builders to increase their use circumstances and unlock new prospects.
Beneath are the content material sorts supported by Appwrite and the pattern use case:
- Empty
This response kind in a serverless operate doesn’t yield any output when utilized in a operate. A pattern use case is a operate answerable for initializing the database and corresponding collections.
import 'dart:async';

Future<dynamic> essential(ultimate context) async {
  //name to a different operate can come right here
  return context.res.empty();
}
- Redirect
This sort is used to redirect customers to a different URL. A pattern use case is a operate that redirects customers to a specified URL.
import 'dart:async';
import 'dart:convert';

Future<dynamic> essential(ultimate context) async {
  ultimate knowledge = jsonDecode(context.req.physique);
  return context.res.redirect(knowledge["url"], 301);
}
- JSON
This sort returns a JSON. A pattern use case is a operate that uploads recordsdata into storage and returns the add data.
import 'dart:async';

Future<dynamic> essential(ultimate context) async {
  //add to storage code
  return context.res.json({"upload_id" "erjkdkkSAMPLE_UPLOAD_2343ujej"});
}
- HTML
This sort returns HTML content material. A pattern use case is a operate designed to handle an RSVP kind.
import 'dart:async';

Future<dynamic> essential(ultimate context) async {
  ultimate html = '''<!doctype html>
      <html lang="en">
      <head>
        <meta charset="utf-8">
        <title>Contact Kind</title>
      </head>
      <physique>
        <kind motion="https://style-tricks.com/" methodology="POST">
          <enter kind="electronic mail" id="electronic mail" title="electronic mail" placeholder="Electronic mail" required>
          <button kind="submit">Submit</button>
        </kind>
      </physique>
      </html>
      ''';

  return context.res.ship(html, 200, {'content-type': 'textual content/html'});
}
- Textual content
This sort returns a textual content. A pattern use case is a operate designed to confirm the operational standing of a service.
import 'dart:async';

Future<dynamic> essential(ultimate context) async {
  //api verify to a service
  return context.res.ship("The service is operating!");
}
Now that we perceive Appwrite’s serverless operate and its assist for a number of content material sorts, we are able to construct our software and check a number of responses.
Create Appwrite’s serverless operate to get a number of content material sorts
Arrange a undertaking on Appwrite
To get began, we have to create a undertaking on Appwrite’s console to deploy and check our operate. To do that, log into the Appwrite console, click on the Create undertaking button, enter appwrite_content_type because the title, and Create.

Secondly, we should navigate to the Features tab and create a operate utilizing the Dart template.

Enter appwrite_content_type because the title and proceed.

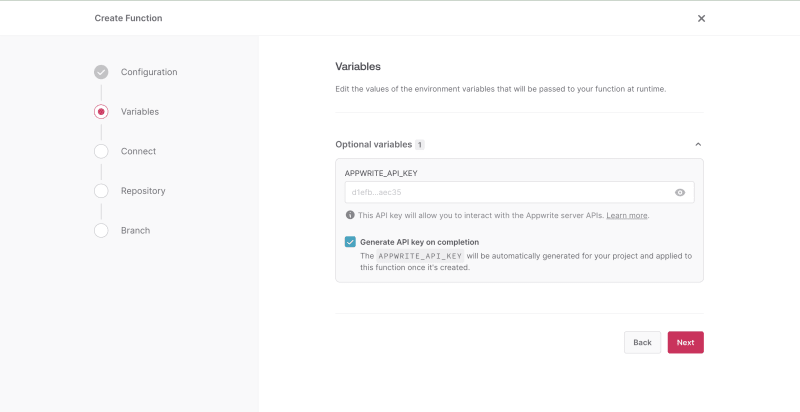
Examine the Generate API key on completion possibility in order that our operate can securely connect with Appwrite and proceed.
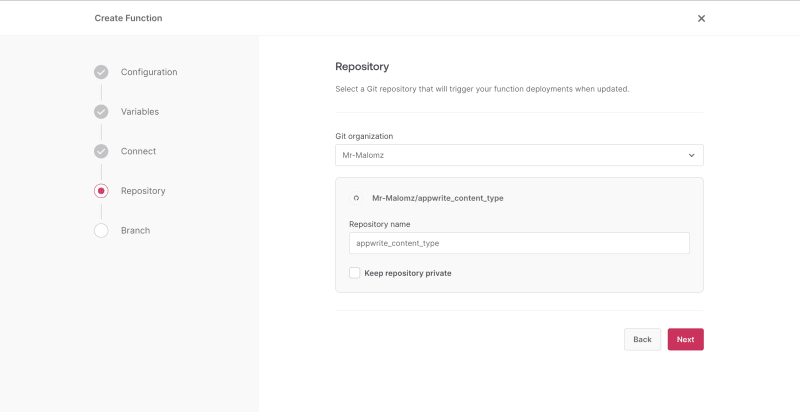
Examine the Create a brand new repository possibility and connect with GitHub by following the immediate.


On connection, enter appwrite_content_type because the repository title, settle for the default department suggestion and Create.

With that performed, we should always see our deployed operate on Appwrite and the corresponding supply code on GitHub.


Modify the generated supply code on GitHub
Subsequent, we should modify the generated operate supply code on GitHub by navigating to the lib/essential.dart file, click on the Edit icon, and add the snippet beneath:

import 'dart:async';
import 'dart:convert';

Future<dynamic> essential(ultimate context) async {
  ultimate knowledge = context.req.headers;
  ultimate responseType = json.encode(knowledge['Content-Type']);

  swap (responseType) {
      case 'software/json':
        return context.res.json(
            {'kind': 'It is a pattern JSON response from Appwrite operate'});
      case 'textual content/html':
        return context.res.ship(
            '<h1>It is a pattern HTML response from Appwrite operate</h1>',
            200,
            {'content-type': 'textual content/html'});
      default:
        return context.res
            .ship('It is a pattern textual content response from Appwrite operate');
    }
}
The snippet above will get the request header primarily based on a header and conditionally returns an identical response kind.
Lastly, we should commit the modifications by clicking the Commit modifications… button, enter applicable commit message, and save.

With that performed, Appwrite will mechanically redeploy our operate utilizing the up to date supply code.

Leveraging deployed operate in a Flutter software
To get began, we have to clone the undertaking by navigating to the specified listing and operating the command beneath:
git clone https://github.com/Mr-Malomz/flutter_appwrite_content
Working the undertaking
We have to set up the undertaking dependencies by operating the command beneath:
flutter pub get
Then, run the undertaking utilizing the next command:
flutter run
The command above will run the applying on the chosen system.

Add platform assist and replace operate permission
To securely join our Flutter software with Appwrite, we have to add it as a supported platform on the console. To do that, navigate to the Overview menu and click on the Flutter button.

Subsequent, we should modify the Flutter software as detailed beneath:
To acquire our Bundle ID, navigate to the trail beneath:
ios > Runner.xcodeproj > undertaking.pbxproj
Open the undertaking.pbxproj file and seek for PRODUCT_BUNDLE_IDENTIFIER.

To acquire our bundle title for Android, navigate to the trail beneath:
android > app > src > debug > AndroidManifest.xml
Open the AndroidManifest.xml file and replica the bundle worth.

We should additionally modify the AndroidManifext.xml as proven beneath:
<manifest>
  <software>
    <exercise android:title="com.linusu.flutter_web_auth_2.CallbackActivity" android:exported="true">
      <intent-filter android:label="flutter_web_auth_2">
        <motion android:title="android.intent.motion.VIEW" />
        <class android:title="android.intent.class.DEFAULT" />
        <class android:title="android.intent.class.BROWSABLE" />
        <knowledge android:scheme="appwrite-callback-[PROJECT_ID]" />
      </intent-filter>
    </exercise>
  </software>
</manifest>
We should additionally change the [PROJECT_ID] part with our precise Appwrite undertaking ID. We will get our undertaking ID from the Overview tab.

Lastly, we should replace the deployed operate permission to make use of it in our Flutter software. To do that, navigate to the Settings tab of the deployed operate, scroll to the Execute Entry part, choose Any, and Replace.

PS: Appwrite ships with a sturdy position and entry administration to cater to particular person and firm wants.
Create a service
With that performed, we have to create a service file to separate the applying core logic from the UI. To do that, create a utils.dart file contained in the lib listing. Then, add the snippet beneath:
import 'bundle:appwrite/appwrite.dart';

class _AppConstant {
  ultimate String endpoint = "https://cloud.appwrite.io/v1";
  ultimate String projectId = "REPLACE WITH PROJECT ID";
  ultimate String functionId = "REPLACE WITH FUNCTION ID";
}

class ContentService {
  Shopper _client = Shopper();
  ContentService() {
    _init();
  }

  //initialize the applying
  _init() async {
    _client
        .setEndpoint(_AppConstant().endpoint)
        .setProject(_AppConstant().projectId);

    //get present session
    Account account = Account(_client);

    strive {
      await account.get();
    } on AppwriteException catch (e) {
      if (e.code == 401) {
        account
            .createAnonymousSession()
            .then((worth) => worth)
            .catchError((e) => e);
      }
    }
  }

  Future getContentType(String selectedType) async {
    Map<String, String> contentTypes = {
      "textual content": "textual content/plain",
      "json": "software/json",
      "html": "textual content/html"
    };
    Features capabilities = Features(_client);
    strive {
      var consequence = await capabilities.createExecution(
        functionId: _AppConstant().functionId,
        headers: {'Content material-Sort': contentTypes[selectedType]},
      );
      return consequence.responseBody;
    } catch (e) {
      throw Exception('Error creating subscription');
    }
  }
}
The snippet above does the next:
- Creates a non-public class
_AppConstantto save lots of required properties - Creates a
ContentServiceclass with_clientand_accountproperties to hook up with the Appwrite occasion - Creates an
_initmethodology that configures Appwrite utilizing the properties - Creates a
getContentTypemethodology that makes use of the_clientproperty to create an occasion of the operate after which use thecreateExecutionmethodology to set off the operate with the required parameters
Consuming the service
First, we have to modify the residence.dart file contained in the screens folder by importing the required dependencies and utilizing the service to carry out required operations:
import 'bundle:flutter/materials.dart';
import 'bundle:flutter_appwrite_content/utils.dart';
class Dwelling extends StatefulWidget {
  const Dwelling({tremendous.key});
  @override
  State<Dwelling> createState() => _HomeState();
}
class _HomeState extends State<Dwelling> {
  ultimate _formKey = GlobalKey<FormState>();
  var _selected = '';
  var _dropdownItems = ["text", "json", "html"];
  bool _isLoading = false;
  var _contentValue = '';

  _handleContentType() {
    setState(() {
      _isLoading = true;
      _contentValue = '';
    });
    ContentService().getContentType(_selected).then((worth) {
      setState(() {
        _isLoading = false;
        _contentValue = worth.toString();
      });
      ScaffoldMessenger.of(context).showSnackBar(
        const SnackBar(content material: Textual content('Content material retrieved efficiently!')),
      );
    }).catchError((e) {
      setState(() {
        _isLoading = false;
      });
      ScaffoldMessenger.of(context).showSnackBar(
        const SnackBar(content material: Textual content('Error retrieving content material!')),
      );
    });
  }

  Widget construct(BuildContext context) {
    //UI code goes right here
  }
}
The snippet above does the next:
- Imports the required dependency
- Line 12-13: Creates the
_isLoadingand_contentValueproperties to handle software state and outcomes from the service, respectively - Line 15-36: Creates an
_handleContentTypemethodology that makes use of thegetContentTypeservice to get the required content material
Lastly, we should replace the UI to make use of created properties to handle the applying state and show returned content material.
//import goes right here

class Dwelling extends StatefulWidget {
  const Dwelling({tremendous.key});
  @override
  State<Dwelling> createState() => _HomeState();
}
class _HomeState extends State<Dwelling> {
  //state goes right here

  _handleContentType() {
    //code goes right here
  }

  Widget construct(BuildContext context) {
    return Scaffold(
      backgroundColor: Colours.white,
      appBar: AppBar(
        title: Textual content("Appwrite Perform Content material"),
        backgroundColor: Colours.black,
      ),
      physique: Padding(
        padding: const EdgeInsets.symmetric(horizontal: 16.0, vertical: 30.0),
        little one: Column(
          kids: [
            Form(
              key: _formKey,
              child: Column(
                children: [
                  Column(
                    crossAxisAlignment: CrossAxisAlignment.start,
                    children: [
                      //title
                      Column(
                        crossAxisAlignment: CrossAxisAlignment.start,
                        children: [
                          const Text(
                            'Data type',
                            style: TextStyle(
                              color: Colors.grey,
                              fontSize: 14.0,
                            ),
                          ),
                          const SizedBox(height: 5.0),
                          DropdownButtonFormField(
                            items: _dropdownItems.map((String item) {
                              return DropdownMenuItem(
                                value: item,
                                child: Text(item),
                              );
                            }).toList(),
                            onChanged: (value) {
                              setState(() => _selected = value!);
                            },
                            decoration: InputDecoration(
                              contentPadding: const EdgeInsets.symmetric(
                                  vertical: 10, horizontal: 20),
                              hintText: "select data type",
                              focusedBorder: OutlineInputBorder(
                                borderRadius: BorderRadius.circular(10),
                                borderSide:
                                    const BorderSide(color: Colors.grey),
                              ),
                              enabledBorder: OutlineInputBorder(
                                borderRadius: BorderRadius.circular(10),
                                borderSide:
                                    const BorderSide(color: Colors.grey),
                              ),
                              errorBorder: OutlineInputBorder(
                                borderRadius: BorderRadius.circular(10),
                                borderSide: const BorderSide(color: Colors.red),
                              ),
                            ),
                          ),
                        ],
                      ),
                    ],
                  ),
                  const SizedBox(top: 30.0),
                  SizedBox(
                    top: 45,
                    width: double.infinity,
                    little one: TextButton(
                      onPressed: () {
                        if (_formKey.currentState!.validate()) {
                          _handleContentType();
                        }
                      },
                      fashion: ButtonStyle(
                        backgroundColor:
                            MaterialStateProperty.all<Shade>(Colours.black),
                      ),
                      little one: const Textual content(
                        'Get content material',
                        fashion: TextStyle(
                          colour: Colours.white,
                          fontWeight: FontWeight.daring,
                          fontSize: 14.0,
                        ),
                      ),
                    ),
                  ),
                ],
              ),
            ),
            const SizedBox(top: 40.0),
            Container(
              width: MediaQuery.of(context).dimension.width,
              top: 200.0,
              padding: EdgeInsets.all(10),
              ornament: BoxDecoration(
                border: Border.all(colour: Colours.blueAccent),
                borderRadius: BorderRadius.round(10),
              ),
              little one: Textual content(_contentValue),
            )
          ],
        ),
      ),
    );
  }
}
With that performed, we restart the applying utilizing the code editor or run the command beneath:
flutter run

Conclusion
This publish mentioned the assist for a number of content material sorts in Appwrite operate and find out how to use it in a Flutter software. Along with the use circumstances talked about above, Appwrite’s assist for a number of content material sorts unlocks thrilling prospects for builders by permitting them to dynamically construct varied forms of purposes.
These assets may additionally be useful: